
USING THE PALLET LAYER EDITOR
QPM Version: 4.7.3.
The following screenshots and movies illustrate how the pallet Layer Editor can be used to move, add and remove boxes on a given load. In this first part, we will see how the boxes can be moved around and how we can select different layers. The first step for running this quick tutorial is to run QPM and open a new window starting from primary package dimensions. The only difference with the default data will be to select "2x2x2 Tray" instead of RSC in the box construction menu. Once that has been changed, we select "Recalculate" from the Tools menu.

The resulting window should contain a list of pallets at the bottom that contain different tray arrangements, the information for the selected pallet at left, the pallet drawing in the center and the list of available trays at right. In case the box drawing shows an empty tray, we can click the drawing with the right button (on a Windows PC) or ctrl+click (on a single-button Mac) to change the box view.

The updated box drawing should look like the one in the screenshot at right.

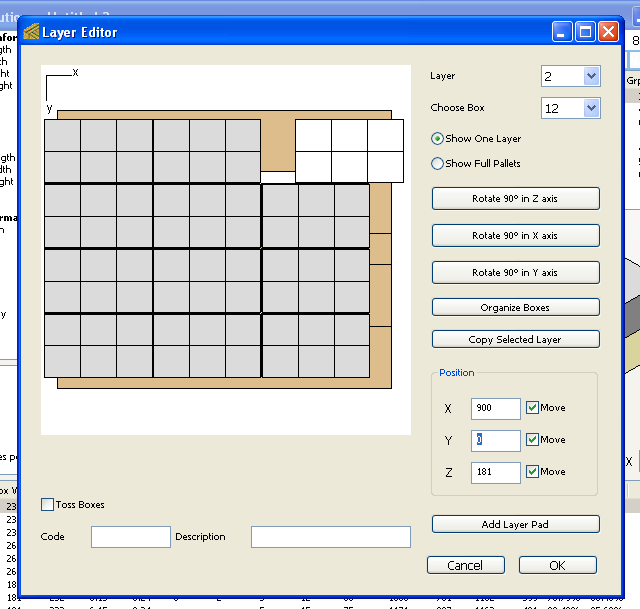
The next step is to select "Layer Editor" from the Tools menu. This will show the Layer Editor window, from which we can change the position and the orientation of the boxes in the pallet.

If we selected the first pallet from the list, the Layer Editor window should look like the one in the screenshot at right.

The image below shows how the Layer Editor is used for viewing the different pallet layers (see movie). The top menu can also be invoked through Ctrl+(layer number) for Windows computers and Command+(layer number) for Mac OSX.

For the image below (see movie), we have closed the Layer Editor window without saving the changes (clicking on "Cancel"), selected the second pallet from the list in the Solutions Window and then opened the Layer Editor again by using the appropriate command from the Tools menu. The purpose of this animation is to show how the user can drag the selected box and restrict the axii in which the said box can be dragged. Note that the movie shows how the box is dragged in the xy plane. However, dragging boxes is possible in all three planes from the views that are perpendicular to them. The plane will be represented in the quadrant marker in the top-left corner of the drawing.
This last image shows how a box can be flipped in any of the three axii (see animation). Note that the box will only be flipped if there is space available. Otherwise, a clicking sound will be heard and the box will remain in its original position and orientation. For example a box in the bottom row usually needs to be moved out from below the other boxes to flip it.
